All posts by Mooky Desai

The Jeep Story – Steps

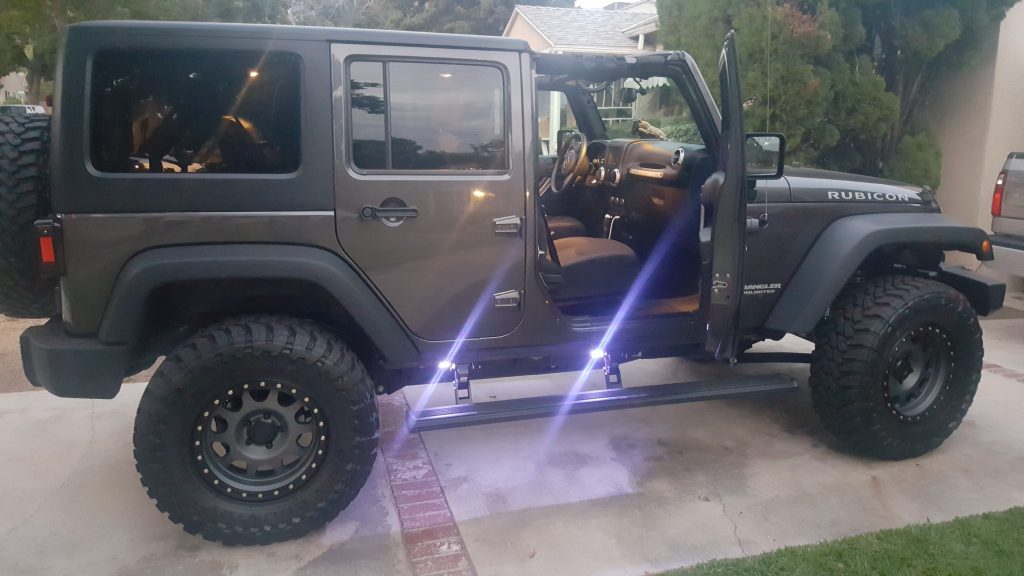
My wife and I are not tall people. We also have 2 young daughters. Our 2014 Rubicon came with stock rocker guards. No steps like the Sahara model. While these worked good for protecting the side of the Jeep, they didn’t provide us with a step after we lifted the Jeep 3.5 inches. It was pretty tough to get in and out of. We didn’t have plans to do too much rock crawling so we didn’t need hard core rock sliders.  After looking at all the options on the market, we decided we liked the look of the AMP Research PowerStep running boards. These are power steps that deploy when the door is opened and retract back up once the doors are closed. When they deploy, they also provide a nice set of LED lights to illuminate the running boards. AMP had just released a dual motor version of the steps called the PowerXtreme. With a ruggedized texture to provide more traction when wet or covered with mud or snow, these really fit the bill since we snowboard often and camp in the dirt and mud. They cost about $1800 and they were a blast. The kids loved them, the wife thought they were awesome…

…until they didn’t work all the time. Unfortunately, these became the first casualty of the build. After working with my shop to get the first controller swapped out, it too began working intermittently. LUND who owns AMP has great support. I worked with them and they sent me the most current version of the controller. They didn’t even put me through the hassle of sending the old controller back. Sadly enough, that one failed too and I had to send them back to Extreme Terrain. Again, LUND made this very easy despite some initial push back from Extreme Terrain. Both were extremely helpful with the whole process in the end. It took about a couple of weeks to get the funds back into my account but I was on the prowl for some non-electric replacements. I’m looking at some grab handles too. Like I said, we are not of the tall variety.

More to come.

Mining Ethereum (locally)

I setup my own Ethereum-based blockchain this morning and mined some ether. I created two accounts (wallets) and passed Wei (ether “pennies”) back and forth to each other and performed mining in-between to verify the transactions (aka move the money).

  1. Download geth
  2. Unzip it
  3. Initialize geth using this genesis.json file (strip the .zip extension off the filename)

geth –datadir=./datadir init genesis.json

4. Create an account:

geth –datadir=./datadir account new

5. Start the java console:

geth –datadir=./datadir console

Mine some ether!

miner.start(1)

INFO [01-23|11:45:55] Updated mining threads                   threads=1

INFO [01-23|11:45:55] Transaction pool price threshold updated price=18000000000

null

> INFO [01-23|11:45:55] Starting mining operation

INFO [01-23|11:45:55] Commit new mining work                   number=1 txs=0 uncles=0 elapsed=88.981µs

INFO [01-23|11:46:04] Generating DAG in progress               epoch=0 percentage=0 elapsed=7.167s

INFO [01-23|11:46:11] Generating DAG in progress               epoch=0 percentage=1 elapsed=14.543s

INFO [01-23|11:46:18] Generating DAG in progress               epoch=0 percentage=2 elapsed=21.008s

INFO [01-23|11:46:24] Generating DAG in progress               epoch=0 percentage=3 elapsed=27.073s

INFO [01-23|11:55:54] Generated ethash verification cache      epoch=0 elapsed=9m57.721s

INFO [01-23|11:56:00] Successfully sealed new block            number=1 hash=9c9452…2b3045

INFO [01-23|11:58:51] 🔨 mined potential block                  number=18 hash=c0b3d4…823d41

INFO [01-23|11:58:51] Commit new mining work                   number=19 txs=0 uncles=0 elapsed=205.898µs

INFO [01-23|11:58:52] Successfully sealed new block            number=19 hash=8940d2…e026a6

INFO [01-23|11:58:52] 🔗 block reached canonical chain          number=14 hash=e08f17…b69966

INFO [01-23|11:58:52] 🔨 mined potential block                  number=19 hash=8940d2…e026a6

INFO [01-23|11:58:52] Commit new mining work                   number=20 txs=0 uncles=0 elapsed=116.913µs

miner.stop()

You should have some ether in your wallet now!

Check your balance:

eth.accounts

get string

eth.getBalance(“paste string”)

or to see balance in ether:

web3.fromWei(eth.getBalance(eth.accounts[0]), “ether”)

240

Create a second wallet:

personal.newAccount(“abc123”)

Make sure the new wallet exists:

> eth.accounts
[“0x28a3a7967d16e51b3a38c7ae12c9e036472e07ad”, “0x2765108503bbda744203d8c9d3d744 c355f2453d”]

Move 100 from wallet “0” to wallet “1”:

Unlock the sending wallet first:

(personal.unlockAccount(eth.accounts[0], “password_for_wallet“)

Send 100 ether:

eth.sendTransaction({from: eth.accounts[0], to: eth.accounts[1], value: web3.toWei(100, “ether”)})

Performed some more mining to move the money (verify)

> miner.start(1)

INFO [01-23|12:17:30] Updated mining threads                   threads=1

INFO [01-23|12:17:30] Transaction pool price threshold updated price=18000000000

null

INFO [01-23|12:17:30] Starting mining operation

INFO [01-23|12:17:30] Commit new mining work                   number=49 txs=1 uncles=0 elapsed=269.401µs

INFO [01-23|12:17:37] Successfully sealed new block            number=49 hash=cdd60d…09413f

INFO [01-23|12:17:37] 🔗 block reached canonical chain          number=44 hash=4f6fd6…898d8a

INFO [01-23|12:17:37] 🔨 mined potential block                  number=49 hash=cdd60d…09413f

INFO [01-23|12:17:37] Commit new mining work                   number=50 txs=0 uncles=0 elapsed=135.258µs

> miner.stop()

Check balances:

> web3.fromWei(eth.getBalance(eth.accounts[0]), “ether”)

155 (note 15 additional coins from mining work to vfy txn!)

> web3.fromWei(eth.getBalance(eth.accounts[1]), “ether”)

100

Voila!

Transaction details:

> eth.getTransaction(“0xef3f9391e569ff205768d3e27bf7cf73308c5e8de0859b4e8fe096c26ba53”)

{

blockHash: “0xcdd60d0b3722adc0fba3c4956a02f8e6120b717371d335f6ae6849a09413f”,

blockNumber: 49,

from: “0x28a3a7967d16e51b3a38c7ae12c9e036472e07ad”,

gas: 90000,

gasPrice: 18000000000,

hash: “0xef3f9391e569ff205768c68d3e27bf7cf73308c5e8de0859b4e8fe096c26ba53”,

input: “0x”,

nonce: 0,

r: “0xf5981cbee6da86dc162787a8814d8dc30a874f3777228cdc1d03a20de10776b2”,

s: “0x7e3606f0e791493e166212dbec20161aa0aa6cec594bfb82214ed91cb000ff”,

to: “0x2765108503bbda744203d9d3d744c355f2453d”,

transactionIndex: 0,

v: “0xed”,

value: 100000000000000000000

}


Block details:

> eth.getBlock(“0xcdd60d0b22adc0fba3c4956a02f8e64ed120b717371d335f6ae6849a09413f”)

{

difficulty: 131072,

extraData: “0xd7830107038467657487676f312e392e32856c696e7578”,

gasLimit: 329424,

gasUsed: 21000,

hash: “0xcdd60d0b3722adc0fba3c4956a02f8e64ed120b717371d335f6ae6849a09413f”,

logsBloom: “0x0000000000000000000000000000000000000000000000000000000000000000                                                                                                                                                             00000000000000000000000000000000000000000000000000000000000000000000000000000000                                                                                                                                                             00000000000000000000000000000000000000000000000000000000000000000000000000000000                                                                                                                                                             00000000000000000000000000000000000000000000000000000000000000000000000000000000                                                                                                                                                             00000000000000000000000000000000000000000000000000000000000000000000000000000000                                                                                                                                                             00000000000000000000000000000000000000000000000000000000000000000000000000000000000000000000000000000000000000000000000000000000”,

miner: “0x28a3a79d16e51b3a38c7ae12c9e036472e07ad”,

mixHash: “0x52f1d43a0d0f20de558ae892bd0be8d4f39231f73569a03a70d9274be9f475”,

nonce: “0x736267a32012d9”,

number: 49,

parentHash: “0x823fe9ab5c194169a5321193bbe61357cf56f958ed77f5d23ad9018b0b602b”,

receiptsRoot: “0xb91d6e796beda886fc0ea068b01d824a2a57f9ab48457046c3410feeaa0198”,

sha3Uncles: “0x1dcc4de8dec75d7aab85b567ccd41ad312451b948a7413f0a142fd40d49347”,

size: 651,

stateRoot: “0xfdc68f56dfd304be1405ccecc0f25eb70b5db2bf78f173e12022dbbd39bf20f9”,

timestamp: 151672750,

totalDifficulty: 644896,

transactions: [“0xef3f9391e569ff205768c68d3e27bf7cf7335e8de0859b4e8fe096c26ba53”],

transactionsRoot: “0x356c5cacb2a696f43a194473badaa8fa5ec1c2fef6e0e1b9cc341e569ec1”,

uncles: []

}

This is step one for creating my own DAPP.  Hopefully this helps you.

If you have any questions, comments, or suggestions, let me know.

Thanks!
The Jeep Story – Lift Kit

Clearance! We needed more ground clearance. The curb at our house was nearly as tall as the bottom of the stock sliders. We wanted to install some nice big 35″ mud terrain tires. There were a couple of options. Get some bigger fenders and some leveling blocks or take the dive (aka spend the money) and get all new springs and shocks with a lift kit. We wanted to do it the right way so we decided on the “lift kit” route. I started doing some research. I visited a couple of shops around my area and felt like I was just being pushed to buy their vendor of choice. JKS here, ProComp there…I didnt like it.

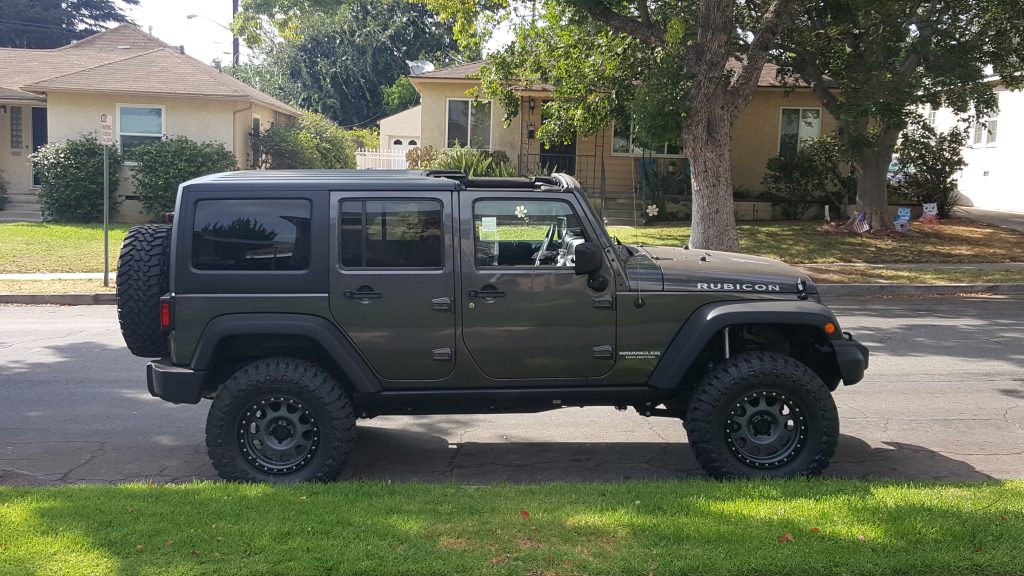
After days of perusing the internet, I decided on a company called American Expedition Vehicles (AEV). They have a long reputation of making quality OEM fit and finish parts for Jeeps and Rams. More importantly, they do a lot of B2B sales. In fact, Jeep themselves called on AEV to provide bumpers for certain special editions (MW3) that rolled off the factory floor. Another nice part about the AEV kit is that it came with everything needed to properly lift the Jeep without changing the ride too much. Cheap lift kits can be a nightmare, cause bump steer, and just generally be unsafe at speed. Since my wife and kids were going to be in here primarily, I didnt want to take any chances. The AEV DualSport RS kit was roughly $2500 bucks and it included a set of Bilstein 5160 shocks with remote reservoirs. It provided 3.5″ of lift and plenty of clearance for the 18″ Method Vex wheels wrapped in 35″ Toyo Open Country MT (Mud Terrain) tires.

This is what it looked like when we brought her home from the shop.

We were happy with our decisions and were ready to get it ready for some off-roading and overland adventures!

Jeep Story – The Intro

My wife and I had two little baby girls within 18 months of each other. At the time, we had a Ford F-150 and a Mazda CX-7. Cool cars for us hipster parents. Add the requirement of hauling 2 strollers everywhere you go and the bed of the F-150 or the trunk of a compact (but fun!) crossover seemed like bad options. We bought  a 2-munchkin stroller eventually but try putting that in the back of a CX-7 along with diapers and groceries for the week! We eventually bought a shiny new minivan. Not just any minivan for us though. We bought the “Swagger Wagon”. The Toyota Sienna SE. One cool minivan. Altezza taillights, 19″ wheels, factory aerokit, LED projector headlights, Dual-DVD rear entertainment, for the kids…pretty sweet. It served us well but it was a minivan and the wife was over it. At a recent (annual) visit to the LA Auto Show, she fell in love with Jeeps. We got some estimates on trading the van in but at the last minute, found a buyer on Craigslist who just happened to live next to a used Jeep I wanted to explore at a dealer.  I met the guy at a bank close by and just like that, the van was sold. I was left without a car for my wife though so I headed over to the Jeep dealer and inspected the Jeep. It had a ding in the door but it seemed like a decent deal and I needed a replacement for the van so I bought it. This is the Jeep when I took delivery. Its a 2014 Granite Crystal Rubicon Unlimited.

We wanted  a little more aggressive look so we looked into what it would take to make it look a little more “fun”. Our journey is documented on the next few pages. We hope you enjoy!

“NVMe”

What’s in a name? A lot.

NVMe is getting used a lot. Im not sure everyone understands the difference between SCSI, ATA, and NVMe. Or M.2, U.2, PCIe or whatever else as it relates to NVMe. I am not sure I am completely savvy with all of it either honestly so please leave your comments below. My understanding of all this…NAND, Flash, SSD, PCIe, M.2, NVMe-oF…”stuff”… is documented here. I wont get into the details of the SSDs themselves such as MLC, TLC, eTLC, etc. in this post.

I remember the day I learned about Fusion-IO. Chips on a board that plugs into a PCI slot that gives you disk space was crazy enough. The speeds that you could achieve were even crazier. This helped resolve an internal performance issue for me overnight. Stuck these puppies in our HP BL460 Based Build Servers and BOOM! Code was getting compiled all the time, simultaneously, and quickly. Days down to hours. It was performance issue Nirvana. I wanted one of these for my PC at home! They were extremely expensive. Far too much for any home user to consider.

A few years later, I took the plunge and bought a fancy SSD drive to replace my old 7200 RPM SATA drive. I bought this fancy new drive and plugged it right back into the same connector that I pulled my slow SATA drive off of. This seemed crazy! This fancy non-spinning super fast drive and I plug it into the same old connector? Same bus? 6 Gb/sec? This couldn’t be!

Couple of years after that, I replaced my motherboard and video card etc. and noticed this little connector called M.2. “What goes in this M.2 slot?”, I thought.

M.2 (and U.2) slots are just connectors. Its the physical form factor. Depending on the way they are “keyed” (how far the little tab is away from one side (or how many “pins” away)) they can connect drives or other devices such as a Wi-Fi, Bluetooth, or cellular cards. SATA-based M.2 SSD drives are keyed differently than NVMe drives. NVMe requires PCIe x4 while SATA only requires PCIe x2. Thus the different tab locations on the drives themselves. They are keyed differently. NVMe drives wont necessarily always work on an M.2 connector and vice-versa. Although they may *fit*, the motherboard and BIOS need to support PCIe M.2 SSD and/or SATA M.2 SSD specifically.

NVMe is a command set. This is similar to SCSI commands we are all used to. Similar to ATA. A serial-attached SCSI (SAS) device generally has a single queue capable of 256 commands. Comparably, NVMe has 64,000 queues each capable of 65,535 commands.

NVMe takes advantage of high speed access that SSD drives provide and what SAS and SATA cant.

There is also the new world of Optane Technology that uses Intel’s 3D Xpoint Memory Media along with RST to provide an acceleration solution to your HDD, SSHD, or SATA SSD. Think high speed cache for your spinning disk for frequently/recently used data. Install the drive and boot windows. It will take a bit. Boot it again and then again and you will see it boot faster. This is the cache of the Optane drive warming up that you feel.

These drives use the B and M keys of the M.2 form factor. This must be PCIe M.2. and not SATA M.2. You must also have a 7th Gen Intel Core Processor-based system. Windows 10 is also required. Linux is not currently supported as of this write up. One major drawback of using this solution in your desktop is the inability to decouple your Optane drive from your “capacity” hard drive. Remove either one and you’re hosed. No boot for you. While the Optane drive can be used as a standalone NVMe SSD drive, Intel does not support that as of this writing.

In my next post, I will cover the implications of these technologies as it pertains to the enterprise. At the consumer level, this is all “local” access and getting NVMe commands down to the disk is a little less complicated in reasons I will also explain in that post.

Hopefully this clears up your questions about all the new tech. If you have any questions or comments, feel free to leave them below. Thanks for reading and happy computing!


Cohesity

Cohesity is a web scale, appliance-based, secondary storage platform started by Mohit Aron formerly from Nutanix and Google. Each 2U appliance is Intel x86-based and consists of four 16 core nodes (Dual 8-way). Each node contains three 8TB spinning disks, one 1.6TB PCIe MLC Flash drive, and 2x 10Gb ports.

Much like the Rubrik solution, this also runs backup software natively on the platform thus eliminating the need for costly licenses for Veeam or Commvault. The need for server hardware is also eliminated.

Also similar to Rubrik, this solution leverages policies to take backups instead of the traditional method of specifying the data set, specifying a target, setting up a schedule, and saying, “go!”. Using these policies based on your RTO/RPO, one can use the built-in cloud gateway functionality to ship the coldest (idle) data off to the cloud.

Different to most backup platforms is the ability to use the data that is backed up immediately. Data isnt locked up in a backup job anymore. Leveraging the Journaled OASIS file system, they are able to present NFS, SMB, and S3 protocols natively. Part of the file system is something called SnapTree which allows for an infinite amount of snapshots with no performance penalties  like traditional arrays create.

The solution supports variable length global deduplication (even to the cloud!), encryption, replication to AWS cloud natively (CloudReplicate), compression, and even runs MapReduce natively. One benefit of this solution is the ability to index all the data coming in. Similar to what Object Storage solutions provide, you get fully searchable data. Pretty neat stuff and a real game changer.

In the enterprise, most people have their primary storage for databases for the application. Something like Pure Storage. These enterprises have “other” data which needs a home. Cohesity (and Gartner) refer to this as dark data. Cohesity is looking to be the platform for this dark data. When I was a manager at my last gig, we had a basic flash solution for our databases and then had an entire FlexPod environment for “everything else”. We also had an entire environment for backups for compliance/contractual reasons more than anything. Those environments mandated a lot of hardware, consumed a lot of rackspace and power and cooling. Not to mention the various management interfaces I would need to “run” things. Looking back, this would have helped to solve the problem of our backup environment and eliminated the need for “Utility” filer. Any storage admin knows the deal. “We cant delete that 4 TB of data”. There are usually 4-5 instances (volumes) like that, at least. I could have ripped out about 30 RU worth of gear and replaced it with 4 – 8 using Cohesity. Strategically, I would have immediately been able to leverage the cloud for cold data instead of buying yet another appliance for that use case (think AltaVault). Beyond that, my RTO would be reduced to minutes vs hours. That’s peace of mind and a HUGE win in the efficiency column.

If you would like to know more about this solution or have any questions on the data provided, please email me or leave a comment below.